Week 9
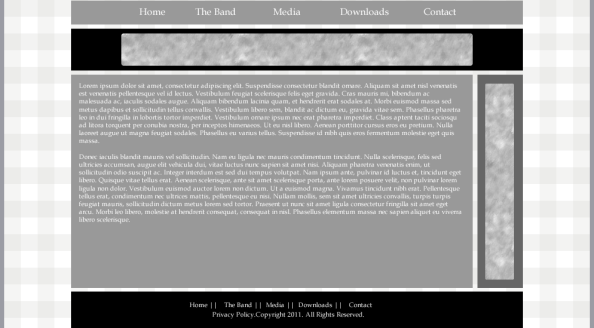
This week started the actual construction of our final projects. We made the wire frame design for our sites, which is just the basic structure of the page. In my case I did the homepage because I felt that that would be more involved than any of the other pages that I create. Also with the creation of our wire frames marks the end of our project profiler, it’s almost time to start coding! =] I’ve uploaded my wire frame design below, I put a lot of work into it and I feel like it will end with a really nicely created page. I used a couple of different websites to give me ideas; mostly metallica.com and the battlefield 3 website, which i’m excited to say came out today. =D The only big changed that I made to the design is that I moved the navigation links to being on top of the top banner, for some reason I think this would make it look a lot different than most modern websites and give it a really nice look in the end. On the right side, i’m going to put a small vertical banner, just something to spice up the page a little bit. It will appear on every page that I created so it should look pretty cool. Then obviously in the top I have the navigation links. The bank link is going to take the users to a page where they can read profiles on all of the band members, they thought they would feel more connected to the fans if they did this. The media link is for samples of music, hopefully we will have more of this uploaded shortly after launch. Also we have the downloads section, the downloads section is going to have wallpapers available for download which I will create. Then finally we have the contact link. The contact link is going to provide fans a link to contact the bank at, this is mostly going to be to look for a bassist since they currently don’t have one.
Week 8
This week we have started on our final project, the creation of our own website which will actually be uploaded to a webpage. This week I mostly learned about how to start your web page and so far it’s helped me quite a bit, especially considering I had no idea how to even start making one just yet. The easiest way that I have learned to make a web page so far is by first thinking up an idea, something you even want to make the web page about. After you’ve decided on a topic you then need to move onto making your morgue files. The morgue files are a collection of screen shots from other websites and ideas from other pages which you may end up wanting to incorporate into your own page design! My actual live morgue file is linked to here. ~> Final Project – Morgue Files Since my final project is going to be about a local band, I decided to take a look mostly at band websites, except for the Battlefield 3 web page of course, that’s a frequent visit for me anyway.. As you can tell I have background designs, layout designs, and even a finished logo, or mostly finished anyway. After you complete your morgue files, you should start a project profile and a design document. These are just word documents that you type up so that you have a plan down. A few of the questions you should be asking yourself during the design document phase is; “Who will update the content?”, “How much is this even going to cost?” There are a lot more things you need to think about then just that though. After you have made the basic design document, you might want to think through it a little more. Maybe try making a story board for your page, this will allow you to link out your site so you know how many pages you need and what you need on each page.
Week 6
This week we continued a lot of work with fireworks and Dreamweaver, i’m still not a huge fan of fireworks though. One of the tools we learned about this week was the smart guides, these are turned on by default and they help you to line up different objects and pictures within an image file. Using the smart guides, it makes your image look a lot more professional since all of the images are inline, and mostly the same size. I have added another favorite tool to my list, the filters. The filters allow users to add a predefined change to their image, these filters allow for; adjusting color, blurring, and adding noise to add a little more feeling to an image. In addition to using filters, users are also able to use styles, these styles allow a user to actually change the texture of an image and give it a new feeling, some of the predefined styles include; plastic styles, paper styles, pastel styles, etc. Your creativity is almost limitless when you take the time to explore with styles and filters, you can change any image, and any text to give it that look and feel that you want.
Final Project Ideas
Band – Ode to Blood
This is my friend’s band, I’ve actually been a part of practicing with them for their upcomming EP. My main contact would be Nick, however I do have contact with all of the members. My information would be obtained through Nick and the other members, and I would take all of the pictures and other content myself. I feel that a website would really help them out by getting people to notice them, and they actually feel the same way.
My second idea would be a portfolio for some of the work I wish to do. I really enjoy doing blending and photography so I feel that it would be a lot of fun. I don’t currently have any content, but it would be a lot of fun for me to make a couple items and then add to it.
Week 5 – Adobe Fireworks
 One of the biggest things I’ve learned this week, honestly, is that I don’t like Adobe Fireworks. Though it may be a very helpful tool with vector images and bitmaps, I’ve just not my favorite program to use. Fireworks allows many different functions; image creation, blending, etc but in the end fireworks does allow for users to create a prototype of their website without having to code anything, this allows for feedback to the user from possible clients quicker and easier.
When you’re inside of fireworks using the program, there is a lot of termonology which you may not normally use, or perhaps may not even know what it means!
- Layers: Different pieces of the image, if you take away a layer a piece of the image goes away.
- Frames: Used in animation, what happens every second?
- Guides: These are invisible to the actual image, however they help you divide your image up if needed.
- Slices: Different sections of your image. What happenes if you cut your image into a cake?
Week 4
 I’m incredibly tired, so i’m going to try to keep this one as short/detailed as possible. This week in Web design class we continued with cascading style sheets, specifically; HTML, class and ID selectors. When you’re making a navigation bar with CSS, you’re most likely going to include both anchors, and lists. The anchors that we use are going to take you to a specific part of the website which you specify through code, and the lists are going to be where you allow the user to choose where they want to visit. Therefor, the anchors do the work while lists are what the users see.
Moving on, we come to DIVs, these are basically a division of the website that you chose, which allows you to manipulate the color and look of that specific area. You can use DIVs in order to change multiple paragraphs, a single line, the whole page, whatever you want. The DIV code is used mostly in layout and design.
Another very useful code in CSS is the float tool, which allows you to align elements to the left, right, and center of your page away from any other type of content; text or images. This is coded as #navcontainer {float:left, ;} in your css, and this will allow the navcontainer block to float to the right of any content on the left of the page. On your actual code, you’re looking at <div ID=”navcontainer”>This will now float….. </a>.
Week 3
Whenever we browse the internet we seem to come across images, these images can be pictures of anything; animals, people, nature just to name a few
 . In order for us to see all of these images though they have to be uploaded to a computer, uploaded to a server and then finally coded onto a computer so that users like you can see them! On a typical HTML document the tag for placing an image on a page is the <IMG tag.
For example,
<IMG SRC=”IMAGE URL HERE“>
And this code will display the image right where the code is, without any customization though. There are other attributes that can go along with the IMG tag.
- Src= This tag is used for the source of the image you want to post on your webpage.
- Vspace/h
- space= This is used if you want to put some space around the image, you can use this as a buffer.
- Border= Obviously if you want a border around your image, this is measured in
pixels, such as 2px. - Width/Heights= You can use this tag if you want to altar the height and width of the image, be careful though because this attribute could disorient the image.
- Joint Photographic Experts Group (JPEG) is a popular file type which is
- best used for photographs. Unfortunately with JPEG file types, the better your picture quality the bigger your file size, and sometimes that’s definitely not the best thing to do. JPEG files do allow for different amounts of compression, so you can shave the quality of the image to make a smaller image file, but sometimes you want a cleaner and crisper image.
- Graphical Interchange Format (GIF) image is also another very popular image, but this one is a little different from JPEGs mostly because it allows for animation and movement in images instead of just being a still picture. Another advantage for a GIF image is
that it allows for transparency, which could make a website look a lot better. - Finally, Portable Network Graphics or PNG images are one of the newest types of images. First implemented in 1995 but not widely used in browsers until just recently in 2006. Since this image is so new, most older browsers don’t even display this image correctly! (It’s trying to tell you to update your browsers!) The PNG file format allows for loss less compression, so the picture quality isn’t hurt too badly with a smaller file size.

background-color: #FF0000;
border: 5px solid black;
padding: 20px;
Week 2
 Almost every page ever created has links on that page which points the user to another page. For example when you’re adding a new post to your blog on WordPress, on the left hand side you have a list of different options you can do; Categories, Post Tags, and Copy a Post are just a few of the different things. If you click on one of the options, or links, it’s going to take you to a different area of the site. Now the links which you click have the capability of sending you outside of the current website that you’re visiting but the link will always contain a URL or Uniform resource locator. The uniform resource location is basically the location of the internet in which the website you’re being pointed to is stored.
Now the URL which you’re going to visit is made up of several different parts which is very important to ensure that you arrive at the correct webpage. For example;
http://http://www.wordpress.com
Http is going to be the protocol identifier. The protocol identifier is just going to identify the protocol that is going to be used to identify the webpage. The most common protocol identifier is http. In this case http://www.wordpress.com is going to be our resource name. The resource name is pretty much the part on the internet in which you’re trying to point to. In terms of resource names, wordpress.com is obviously different from facebook.com
Back to HTML, there is so much that you can do to your text in order to really customize it and give it its own feel. Some of the
things you can do include; aligning paragraphs of text, controlling the line breaks, text colors, background colors and even putting in lists.
When you’re making
changes to a paragraph, <P></P>, you can align how you want the text to be displayed. You can align the text to be straight on the left, the right, straight on both sides or just centered and ugly. You would do this through the align attribute of the paragraph tag. <p align=”…”> You can use different attributes like; left, right, centered, or justify.
Another very common tag to use in HTML is the line break tag which just simply breaks the text
at the point of the tag! The tag for a line break is simple, just put < br/> at the exact location in your text where you want the line to break.
For example, “Hello, < br/>I like pie.” Would be rendered as..
“Hello,
I like pie.”
On the other hand though, you also have the option of not allowing line breaks. Natural line breaks are caused by the browser making the text fit on the sc
reen, if you don’t allow for line breaks though it will cause the text to expand off of the screen. This could be considered unattractive to your webpage visitors and probably won’t be used anyway.
Most people use lists, and they probably use them very often. There is plenty of different reasons why you would like to put a list on your webpage. Maybe you’re a teacher and you want to display vocabulary words to your students on the internet (definition list) or maybe you’re a history teacher pointing out generalized changes to the United State’s economy during World War II (Unordered list) or perhaps you’re just a video game fanatic (me) who is designing a website on their favorite video game franchise and want’s to display the titles of the games in order from release (ordered list). Anyway..
- A definition list is going to be used to display a term, and it’s definition. That’s basically all it’s going to be able to do.

- An unordered list is going to be a list where no real order is necessary, when you don’t have to show an event over time perhaps. I’ll use the example of a U.S. history teacher.
- Finally, Ordered lists are lists in which an order does matter.

Week 1
The internet that we use is basically made up of many different websites, which themselves are made up by webpages. There are millions and millions of different webpages out there, and without the different pages there would be no internet
Moving on, each webpage itself has a specific feel to it which is felt through the website designer’s use of color, information, and organization of their webpage. Everyone that designs a webpage is using the coding language called HTML (Hypertext markup language.) HTML is made up of a lot of different tags which change the organization, colors, and fonts of the page. Some of the main codes used include the bolded text code, <BR></BR> or <STRONG></STRONG>. Some other popular codes used in every website include image and link codes, formatting, head and body codes and finally script codes.
There are a lot of websites on the internet which help with HTML coding and it’s history.
•Bullet-proof HTML, from Sitepoint.com
•XHTML Web Design for Beginners, from MIS Web Design
•Getting Started with HTML, from W3C
Furthermore, when a user visits a website the code(HTML, CSS, or JavaScript) has to be interpreted by the browser, which is what you use to visit th e website in the first place. Many of the popular websites are Firefox, internet explorer, google chrome, and opera. When you access a website by typing in a url in a browser, the browser interprets the code in it’s own way, sometimes the code looks different on another browser because of the way it interprets the code. The most popular website used right now is Mozilla Firefox (“Firefox,)” which 42% of internet users are using, next in line is Google Chrome with 29.4%, and then comes Internet Explorer with 22.0% of internet users. When Firefox was released in January of 2003 it was only being used by 7.2% of internet users while internet explorer had almost 85% of internet users, that’s a huge change!
Did you ![]() know if you want to create your own website, you can do it many different ways? One of the ways to do it is by using just a simple text editor to code your HTML, a couple simple text editors you can use include the famous Notepad and even Simpletext. You can also use a WYSIWYG(What you see is what you get) editor. The most popular WYSIWYG editors include; Adobe Dreamweaver, Microsoft Expression, Macromedia Homesite, Notepad++, UltraEdit Pro and also BBedit.
know if you want to create your own website, you can do it many different ways? One of the ways to do it is by using just a simple text editor to code your HTML, a couple simple text editors you can use include the famous Notepad and even Simpletext. You can also use a WYSIWYG(What you see is what you get) editor. The most popular WYSIWYG editors include; Adobe Dreamweaver, Microsoft Expression, Macromedia Homesite, Notepad++, UltraEdit Pro and also BBedit.
Now every time you make a file, whether it’s with notepad or with a WYSIWYG editor you need to save the file, and there are some naming conventions which are important to follow in order to comply with standards.
- Don’t use a filename more than once.
- Keep the file name simple, easy to remember.
- Use lowercase, no uppercase.
- Don’t use spaces.
- Never use any special characters – symbols are not acceptable.
- Feel free to use underscores to separate words instead of spaces.
- Always start a file name with a letter.
- Make sure you include the extension of the file. (.html, or .jpg)
Hey!
Hey everyone!
I created this blog for my Art-170 class. So welcome everyone from my class!
Thanks for stopping in!
